How To Use CoinHive Browser Mining

Hi bro, this time SoloIFX will share how to mine Coin Monero (XMR) via javascript, Monero is one of the digital currency that has a fairly high price, at the time this article made the price of 1 monero equivalent to 161 USD or 0.0222 BTC.

1. WHAT IS COIN HIVE

Coin Hive is a website that distributes facilities to mine monero through javascript, the balance we get from mine will be accommodated here before the transfer to our wallet monero. Javascript Can be placed on bro's website all, so Can take advantage of browser and CPU people who visit the website for XMR floated. the purpose of coinhive is basically to monetize website as an alternative to Ads. Will but for bro who will not have a website, still Can also run mining by saving file with format. Html.

2. WALLET MONERO

To create a wallet monero please go to freewallet.org, then download the Wallet app (Android / iOS).

Alternatively please make a wallet monero in mymonero.com, choose create a modern account, then scroll down, copy your Private Login Key after that Paste to Confirm your Private Login Key. save the secret key as the key to login.

3. RESPONDED TO POLICY

Currently abroad many who reject the use of javascript mining monero because some website owners put javascript unnoticed by visitors to the blog, because with a simple script below the mining process will go directly unnoticed visitors, the only visitors feel the website feels heavy, but Their CPU is drained for the mining process. and many consider this an act of theft. If according to the admin itself this is not a theft, as long as its CPU usage is still in the level of fair (1-4 threads), things like the same aja website owner advertising Pop Ads unnoticed by the reader, tau tau show ads in new tab.


But calmly, this time SoloIFX will share the script that has been broken, so the mining process will appear (visible) by visitors of the blog, and visitors Can run the stop mining process anytime. So the owner of the blog / website makes this mining as an alternative Ads.

4. MINING in a PERSONAL way (NOT FOR WEBSITE)

For those who do not have a blog / website, can run their own mining. Just save the script that SoloIFX share with format.html, then open it with the browser.

Update: in the Dashboard already available links to mine Monero without mandatory installed on the website, just select "Open" as shown below. So you can mine Monero in a private way and will not be required to be posted through the website. Please register first Coinhive via the link below (point 5).

The script view will look like this link, turn off adblocks in browser.

Terms of Service Coin Hive
  • By registering an account with Coinhive, it is understood that you agree to the following terms of service.
  • You must not use Coinhive for any illegal purposes.
  • You must not reverse engineer, hack, exploit or otherwise attack Coinhive or Coinhive's servers.
  • Attempting to exploit, hack or spam Coinhive will lead to the termination of your account.
  • We keep the right to terminate your account at any time for any reason.
  • We are not responsible for damages to you, your servers, your users or your users' hardware caused directly or indirectly by Coinhive.
  • We reserve the right to extend these Terms of Service in the future.
5. STEP STEAM STEPS (FOR INSTALLED IN WEB/BLOG)

  1. Do Mining with Laptop / PC, use the smartphone but it will not be maximal.
  2. Register first Coinhive
  3. Select the dashboard, it will appear that balance bro is still 0 XMR, hehe
  4. Go to settings, choose Sites & Fire Keys, then Create A modern Site
  5. Write the name of the site, whatever is allowed, for example "SoloIFX"
  6. It will appear that our site key will be put in the script, use the public. please copy. example QuDwo6GzHbx8ZRXHk5Kba7gvYAu7HTOn
  7. This is a script mining monero that visible (Can be seen the process). Click here to download.
  8. <script src="https://coin-hive.com/lib/coinhive.min.js"></script> <div style="border: 1px; padding: 10px; color:white; background-color:GREEN; text-align: center;">I am having you mine for Crypto Currency to support this site. Here are your stats:</div> <div style="border: 0; padding: 10px; color:black; background-color:white; text-align: center;"><p></p> <p id="tcount"></p> <p id="hps"></p> <p id="ths"></p> <p id="tah"></p></div> <div style="border: 0; padding: 10px; color:black; background-color:white; text-align: center;">You can START or STOP at anytime but please wait for some Accepted Hashes before you do.</div> <div style="border: 0; padding: 1px; color:white; background-color:silver; text-align: center;"><p id="minebutton"></p></div> <p> <script type="text/javascript"> var miner = new CoinHive.Anonymous('QuDwo6GzHbx8ZRXHk5Kba7gvYAu7HTOn',{threads: 4}); miner.start(CoinHive.FORCE_EXCLUSIVE_TAB); setInterval(function() { var threadCount = miner.getNumThreads(); var hashesPerSecond = Math.round(miner.getHashesPerSecond() * 100) / 100; var totalHashes = miner.getTotalHashes(); var acceptedHashes = miner.getAcceptedHashes() / 256; if (miner.isRunning()) { document.getElementById("tcount").innerHTML = "Threads: " + threadCount; document.getElementById("hps").innerHTML = "Hashes per Second: " + hashesPerSecond; document.getElementById("ths").innerHTML = "Total Hashes: " + totalHashes; document.getElementById("tah").innerHTML = "Accepted Hashes: " + acceptedHashes; document.getElementById("minebutton").innerHTML = "<button onclick=\"miner.stop()\">STOP</button>"; } else { document.getElementById("tcount").innerHTML = "Ups.."; document.getElementById("hps").innerHTML = "Please click START"; document.getElementById("ths").innerHTML = "to support"; document.getElementById("tah").innerHTML = "this site :("; document.getElementById("minebutton").innerHTML = "<button onclick=\"miner.start(CoinHive.FORCE_EXCLUSIVE_TAB)\">START</button>"; } }, 1000); </script></p>
  9. REPLACE QuDwo6GzHbx8ZRXHk5Kba7gvYAu7HTOnwith bro's own site key
  10. Threads Can be adjusted, above 4, if bro taste too heavy please reduce (at least 1)
  11. Please put the script on the blog / website, if blogger add widget, select Html / javascript or for who want to mine in a private way please open the Dashboard, already available links to mine Monero without mandatory installed on the website, just select "Open"
  12. To change the wallet address of Monero (XMR), go to the Settings menu and select Payments.
  13. Balance will go into coinhive bro account as well.
  14. Update: Already available script with permission in advance to the blog visitors, and also serves as an anti block ads, replace https://coin-hive.com/lib/coinhive.min.js with https://authedmine.com /lib/authedmine.min.js (Optional)
Good luck :)

Bitcoin Mining Guide

Bitcoin Mining Guide - Can be used for all Cryptocoin


Hello, this time I will guide you to start the process of bitcoin mining with real hardware, this tutorial is actually the result of adaptation of the actual English-language article, with the intention to facilitate the readers from Indonesia to understand, then I decided to translate to the Indonesian language.

Okay, we start How to Bitcoin Mining

Bitcoin Mining Guide - Can be used for all Cryptocoin.

You will learn:
  1. how bitcoin mining works,
  2. how to start bitcoin mining, 
  3. best bitcoin mining software, 
  4. best bitcoin mining hardware,
  5. where to find the best bitcoin mining pond and 
  6. how to optimize your bitcoin earnings.
Bitcoin mining is difficult to do profitably but if you try then this Bitcoin miner might be good for you. 

How does Bitcoin work?
Before you start Bitcoin mining, it serves to understand what Bitcoin's mining actually means. Bitcoin mining is legal and is done by running the SHA256 double hash verification process to validate Bitcoin transactions and provide the security required for the Bitcoin network ledger. The speed at which you mine Bitcoin is measured in hashes per second.

The Bitcoin network compensates Bitcoin miners for their efforts by providing bitcoins to those who donate the computing power required. This comes in the form of both newly issued bitcoins and from transaction costs that are included in transactions that are validated while mining bitcoins. The more computing power you rely on, the more Bitcoin you get.

Stage 1 - Use the best Hardware to mine Bitcoin

Bitcoin Purchases - In some cases, you may need to purchase mining hardware with bitcoin. Currently, you can buy most of the hardware in Amazon. You may also want to check the bitcoin graph.

How to start Mining Bitcoin?
To start the Bitcoin mining process, you must get the hardware for bitcoin mining. At the beginning of Bitcoin appear, I might mine with a computer CPU or video card processor card {VGA} the high speed it generates. But now it is not possible. Custom Bitcoin ASIC chips offer performance up to 100x older schema capabilities that have dominated the industry for mining Bitcoin.

Bitcoin mining with something lacking in optimization will only consume more electricity than Bitcoin is produced, well it will end up being stumped. It's important to mine bitcoins with the best bitcoin mining hardware made specifically for that purpose. Some companies like Avalon offer excellent schemes created specifically for bitcoin mining.

Best Bitcoin Mining Online Service?
Another option is to buy Bitcoin's Cloud Mining contract. This can simplify the process but increase the risk because you are not in control of the actual physical hardware.

Using this service does not mean we are suggesting. There are a large number of Cloud Mining (Bitcoin) milling scammer. So stay BEWARE !!!
  • Hashflare Review: Hashflare offers SHA-256 mining contracts and more profitable SHA-256 coins can be mined and use automatic payments to BTC. The customer must purchase at least 10 GH / s.
  • Genesis Mining Review: Genesis Mining is the largest provider of cloud mining (Cloud Mining). Genesis Mining offers three affordable Bitcoin cloud mining schemes. Zcash mining contracts are also available.
  • Hashing 24 Review: Hashing24 has been around since 2012. They have facilities in Iceland and Georgia. They use modern ASIC chips from BitFury that deliver maximum performance and efficiency.
  • Minergate Review: Offers Pool and combines mining and Cloud Mining services for Bitcoin.
  • Hashnest Review: Hashnest is run by Bitmain, an antoorer manufacturer of miner Bitcoin. HashNest now has over 600 Antminer S7s for rent. You can see the most up-to-date prices and availability on the Hashnest website. At the time this article is written one hash value Antminer S7 can be rented for $ 1,200.
  • Bitcoin Cloud Mining Review: Currently all Bitcoin Cloud Mining contracts are sold out.
  • NiceHash Review: NiceHash is unique because it uses orderbook to match buyer and seller contracts. Check the website for the latest rates.
  • Eobot Review: Start Bitcoin's cloud mining for $ 10. Eobot claims customers behind the capital even in 14 months.
  • MineOnCloud Review: MineOnCloud now has about 35 TH / s mining equipment for rent in the cloud. Some of the miners available for rent include AntMiner S4s and S5s.
Stage 2 - Download Free Software Mining

Once you receive your bitcoin mining hardware, you must download special software used for Bitcoin mining on your hardware. There are many software out there that can be used for Bitcoin mining, but the two most popular are CGminer and BFGminer which are command line software (no graphic display).

If you prefer the ease of use that comes with the GUI, you might be able to try EasyMiner which is a software click and go windows / Linux / Android, you might be able to learn more details about "The best bitcoin mining software" progress.

Stage 3 - Join to Bitcoin Mining Pool

Once you are ready to mine bitcoin, it helps you join the Bitcoin Mining Pool. Mining Pool Bitcoin is a Bitcoin miner group that works together to break blocks and share results. Without Mining Pool Bitcoin, you might just be mining for more than a year and never get a little coin. It's much easier to share work and share the rewards with other Bitcoin miners and make great hardware. 

Here are some options:
For a fully decentralized Pool, we highly recommend p2pool. The following pools are believed to currently fully validate blocks with Bitcoin Core 0.9.5 or later (0.10.2 or later recommended because of DoS vulnerabilities):

  • BitMinter
  • CK pool
  • Eligius
  • Mud pond
Stage 4 - Setting up Bitcoin Wallet

The next step for bitcoin mining is to install Bitcoin Wallet or use existing Bitcoin Wallet to receive Bitcoin later from Mining Pool mining. Copay is a great Bitcoin wallet and can be used on many different operating systems. Bitcoin Wallet in hardware form is also available.

The other bitcoin wallet cloud systems are:

  • Blockchain
  • Coinbase
  • Xapo
in the year 2017 fee in the wear on every flat transaction can reach 0.0005BTC for bitcoin wallet of this cloud system.

Bitcoin is sent to your Bitcoin Wallet by using a unique address that belongs only to you. The most important step in setting up your Bitcoin Wallet is to secure it from potential hackers by enabling two-factor authentication (A2F) or storing it on offline computers that do not have access to the Internet. Wallet can be obtained by downloading Software Client to your computer.

For advice on choosing Wallet Bitcoin then you can start here (it's in another post).

You should also be able to buy and sell your Bitcoin. For this we recommend:

Local Bitcoin Exchanger (Indonesia):
INDODAX.com - Swap Bitcoin Into Rupiah Indonesia, the largest bitcoin trading site in Indonesia for now.
Triv.co.id - Swap Bitcoin to Indonesian Rupiah, Buy Electric Tokens, Pulses and Other Bills Pay Via Bitcoin

Bitcoin Exchanger Foreign Affairs:
SpectroCoin - European Exchangers can buy by the same day and can use SEPA credit cards
Kraken.com - Europe's largest exchange with the same SEPA

You can advise or promote your own business that accepts payments via bitcoin here, just contact me through the contact form on this website, and I will put it on this list.

Stage 5 - Stay Up To Date With Bitcoin News

Keeping up to date with the news of bitcoin development at the moment is a wise choice if you want to keep looking at opportunities. If you want Bitcoin news in general

Well that's the summary of how to mine bitcoin, this tips also applies to all cryptocoin that uses the same system as bitcoin, so you can say this article hopefully can help you, for later post there will be continued from this post, because there are still many in the discussion that can not be written in this post, because it has its own part, for example Mining Pool you guys have to know.

okay, send your comments below, how the kalo's response about bitcoin for the future, share it to your social media and folow website cryptocoin indonesia for the latest cryptocoin information.

5 Most Reliable and Best Mining Pool Crypto Mine

Some miners have experienced disaster or do not receive payment from mining. There are dozens of mining pools that provide a place to mine digital currency. But only a small portion of the mining pool is trusted and best in terms of payment and network stability. Surely choosing the pool into the main consideration, because the capital we spend is also not small. What if the network pool itself is often a constraint, while the resources we spend continue to run.


Why should we join the mining pool? Bitcoin and Litecoin, these two cryptoes take a century to mine the whole. It requires cooperation in solving puzzles in a pool so that the process of collecting coins faster. Choosing a mining pool should also be noted, the number of pools that are opened now is also not a guarantee you will be paid. Many miners feel aggrieved because the pool suddenly disappears unannounced.

Reliable And Best Mining Pool
According to a survey from TechRadar, there are at least 5 trusted mining pools in terms of withdraw, security and network stability. Pool also includes one of the places that are often attacked by hackers, so it needs a high level of security. The following multi mining pools can be tried:

1. F2Pool
DiscusFish, also known as F2Pool is one of the mining pools based in China. This pool has been in operation since 2013 providing servers in China, Hongkong and the United States. F2Pool currently contributes 5.5 percent of Hash power revenue from all Bitcoin mining. Here we can mine LTC, ZEC, ETH, SC, Dash and Monero. The additional benefit of milling in this pool for every 1 BTC will earn 5 NMC, 100 SYS, 1 EMC.

2. KanoPool
KanoPool is not as big as other pools which only account for 0.3 percent of global Hash power. But this pool is known for the low rate of 0.9 percent Mining fee and easy setup without registration. We simply use the address wallet as the username to mine crypto.

3. BTC dot Com
BTC.com is the most popular mining pool company established since 2016. This pool has accounted for 20 percent of global Hash power that has servers in Germany and China. BTC.com only supports the mining of Bitcoin and Bitcoin Cash. The reward method given in the form of Full Pay Per Share will be distributed to all miners, just like PPS.

4. Antpool
Antpool, is the largest mining pool in the world today that accounts for a quarter of the global Hash power. This pool is owned by Bitmain who also as Antminer manufactures. This pool provides the ease of mining by offering PPS and PPLNS. In addition, this pool also provides solo mining for those of you who have a large power hash.

5. Slush Pool
Who does not know Slush Pool, one of the oldest pools established since 2010 with the previous name Bitcoin mining pool Server. Despite its long standing, the pool has gained a good reputation in terms of network stability and mining accuracy. Slush pool has accounted for 11, 4 percent of global hash power. The interface is also very simple and easy to use, servers are available in the US, Europe, Singapore and China.

Profit Mining Doge Coin (100% Work)

How to Get Dogecoin on Dogeminer 100% Work !!


Dogecoin or better known as Dogecoin snippets among virtual money miners, become one of the most virtual money or very easy to get until we can do tradding or in exchange to Bitcoin.

And at this time I admin ethreumpedia have atay find a site that is legit or far from word SCAM !!. In fact already many friends who have done WD from this site and I think why we do not try guys.

The site is named Dogeminer as it appears on the title of this article guys, and Dogeminer is a Cloud mining site provided who knows who. So my friends here just simply register and get Dogecoin by itself.

Features of this dogpiner adapun there is a free user or there is also a premium user. As the name suggests premium users will get Doge mine power faster than free users. Premium user of course must do Deposit or Invest with minimum send 300 Dogecoin to Dogeminer.

For my friends who are curious about this Dogeminer site, ok let's just let us see the explanation of this diabwah ya guys.

  1. You just go guys visit Dogeminer website click here.
  2. At the beginning of Dogeminer we will see a Textbox and a button marked START MINING colored yellow guys.
    To register directly just guys you fill the textbox tersbut with Dogecoin address in your wallet guys and click STARTING button if it is filled and for more details please see the picture above.
  3. And if you have done stage 2 or registration stage then you have migrated on the site and automatically also usually you will directly log guys to your mining Dashboard page like in the picture below. 
    There will also be seen Ballance or your Dogecoin earnings and there is also Profit opinion per day as well as the mining power Dogecoinya. 
  4. And to do WD or Withdraw you can just click the button marked WITHDRAW yellow colored WITHDRAW kunuing on your Dashboard page. 
    You just enter your Ballance into the textbox and click the CONFIRM button or can also activate the AUTOPAY feature by shifting the guys so the feature will melakuakn WD automatically. But to do WD unfortunately we oblige Ballance kitu has reached 50 Dogecoin guys. 
  5. For free users if you want to maximize the features to increase the mining power can use the affiliate feature to find your reff of course.
And that's the way How to Get Dogecoin in Dogeminer 100% Work !!, hopefully useful and for those who want to practice it please just guys because we can also lakuakn with Free user but will be long or can also do deposit but I do not suggest anyway.

To end this article I thank you for visiting and do not forget to come back again another time and the end of the word I say salam nambang.

MACD Expert - expert for MetaTrader 4

This expert advisor is using the MACD indicator to open trades. It works on any symbol and support 5 and 4 digits brokers. The exits are based on fixed stop loss and take profit values.

Inputs

  • Lot Size
  • Stop Loss in points
  • Take Profit in points
  • Max allowed spread in points
  • EA magic number


DOWNLOAD

Start External Process - script for MetaTrader 4

This script allows you to start any arbitrary external program. Use it as-is or as a starting point for something amazing.
In order for this script to work, you will have to allow it to import DLLs. The DLL should be present in computers running the windows operating system.


Script Parameters

  • Executable name - The executable to run. Include the full path to it if you have to.
  • Commandline parameters - Optional, you can use switches and arguments here.
  • Working directory - Optional, specify the working directory.
  • Window display mode - Set the option for how you want the application to launch.


DOWNLOAD

PriceLines - script for MetaTrader 4

The standard chart grid has a number of peculiarities, that do not allow to determine the price movement at first sight: the grid step changes dynamically when switching timeframes, the step is not tied to the basic levels, such as 1.12000, like in the screenshot below.

The Price Lines script marks the price levels on the chart and supplements the chart grid. It helps to determine the fluctuations in the currency rates at a glance. It is possible to set the color, lines width and their step. The lines are automatically bound to the basic levels.

This script is especially useful on the EURUSD chart, as the price tends to "snap" to levels that are multiples of 50 and 100 points and to "drift" near them.


DOWNLOAD

Multi Pair Closer - expert for MetaTrader 4

This EA will monitor the net profit of a currency basket and close all positions when the specified profit has been acquired. It does not matter which chart you run the bot on, all pairs that you have chosen to monitor will be monitored.

Settings

  • Currency basket - A comma separated list of the currency pairs to watch. This is case sensitive, so use the exact names of your instruments as shown in the market watch window.
  • Profit target in account currency - The net profit amount you're aiming for with the currency basket.
  • Allowed slippage when closing orders - The slippage setting to send with the commands that close positions.

DOWNLOAD

Limit Orders Control - expert for MetaTrader 4

This is a not big assistant for trading with limit orders.

Its meaning is that if you want to place two limit orders on both sides of the price, you will have to wait until one of them is activated to remove the second. So as to avoid wasting time waiting near the computer this assistant had been made. 

At first you place two limit orders, and then place this Advisor on the chart. As soon as one of them is activated the second one will be deleted automatically and a notification will appear, as well as the Adviser's work will be stopped. To resume work, you need to place limit orders again and restart the Advisor (for example, open its settings and, without changing anything, click OK).

There is the option to switch on comments in the settings so you will be known that Advisor is activated (not activated). Also you can set the Magic Number, and then the Advisor will manage orders only with a certain Magic Number without touching the rest.

This assistant had been made at the request of the user mishelbb within the framework of the proposal to create a free indicator in this thread.


Setting:

  • MagicNumber — The Magic Number so that this Advisor doesn’t rule orders of others. Set it to “0” that the orders placed manually are tracked.
  • WriteComments — To allow Advisor’s comments.
DOWNLOAD


Currency Strength Meter - indicator for MetaTrader 4

Currency Strength Meter indicator gets RSI (Relative Strength Index) values from four different instruments of your choice and displays them in indicator window.

Features:

  • Ability to set custom colors and styles for each instrument.
  • Displays colored labels for instrument identification.
  • You can adjust period and applied price.
  • Supports all types of markets (Forex, Commodities, Indices, Crypto Currencies etc.).

Inputs:
  • instrOne - instrument 1.
  • instrTwo - instrument 2.
  • instrThree - instrument 3.
  • instrFour - instrument 4.
  • colorOne - instrument 1 color.
  • colorTwo - instrument 2 color.
  • colorThree - instrument 3 color.
  • colorFour - instrument 4 color.
  • indicatorPeriod - indicator period.
  • appliedPrice - indicator applied price.


DOWNLOAD

Momentum Histo - indicator for MetaTrader 4

This indicator is based on code from the original author Iurii Tokman. I translated it from Russian and made the following improvements:


  • Added trading alerts (Alerts in MetaTrader 4 terminal, Email notifications, Push notifications).
  • Inputs to enable/disable each alert type separately.
  • Instead of only Momentum, implemented a drop-down list of indicators you can choose from.
  • Minor optimizations and fixes.

Inputs
MName - indicator name.
MPeriod - indicator period.
MLevel - indicator level.
MAppliedPrice - applied price for Momentum, CCI or RSI.
Alerts - enable/disable alerts.
Email - enable/disable Email notifications.
Push - enable/disable Push notifications.


DOWNLOAD

TradePanel - expert for MetaTrader 4

Note: The current chart symbol can be switched by writing the desired one in the symbol box.


Used Fonts:

  • Arial
  • Arial Black
  • Calibri
  • Tahoma
  • Trebuchet MS
  • Webdings
  • Wingdings
  • Wingdings 2
DOWNLOAD

If you have found this code useful for trading or educational purposes, don't forget to thank author.

Added Norton Ghost in Hiren's Boot 15.2

IN MANY WAYs - Hiren's Boot CD is a software that is widely used by computer repair experts, in addition to very lightweight this software is quite complete and easy to use.


Many versions have been released to version 15.2 where there are some vitur missing in Hiren's Boot 15.2 is "Norton Ghost".  Norton Ghost itself is a special program used to backup / clone or restore both harddisk backups as a whole and some partitions are then saved as Image / File berextensi (.GHO).


Here we will discuss how to Add Norton Ghost in Hiren's Boot 15.2 
Materials needed:
  1. Hiren's Boot CD 15.2 is Bootable with USB Flashdisk
  2. Ghost.7z program files
Here's How to Add Norton Ghost in Hiren's Boot 15.2
  • Hiren's installed flash plug
  • Copy the Ghost.7z file you have downloaded into the folder (HBCD / Programs / Files) and paste the file.


  • Finished live test by merestar computer or laptop with flasdisk is still stuck
  • Press DEL / F1 or F2 to enter Bios l
  • Change Boot priority to USB then save by pressing F10
  • Restart the computer or laptop
  • Once in Hiren's Boot mode select Windows XP menu
  • Already inside Windows XP choose HBCD menu / Backup Tool / Ghost / Ghost 32
That's how easy Adding Norton Ghost in Hiren's Boot 15.2, hopefully this article useful.

Membuat Backup dan Restore Windows 10

Windows 10 memberikan banyak pilihan aplikasi backup. Microsoft menghadirkan kembali aplikasi backup Windows yang lama yang sebelumnya dihapuskan di Windows serta masih menyertakan File History. Tapi kedua aplikasi tadi hanya beberapa. Masih banyak aplikasi backup Windows 10 yang lain. 

Versi terbaru dari Windows juga memiliki fitur backup dan restore system images, wipe komputer kamu ke default state, menyimpan file dan data secara online, serta membuat recovery drive yang bisa kamu gunakan disaat genting.

Cara Menggunakan File History pada Windows 10
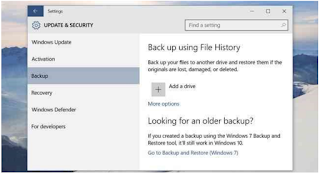
File History, pertama ada pada Windows 8, muncul lagi di Windows 10. File History terintegrasi dengan app “Setting” baru di Windows 10 dan Control Panel lama, karena fitur backup Windows 7 hanya tersedia di Control Panel.

Fitur ini memang terbilang terbatas karena hanya mem-backup file yang terletak di librari akun pengguna. Kamu harus membuat librari muncul di File Explorer dan menambahkan folder ke librari tersebut atau membuat librari baru jika kamu ingin mem-backup file yang tersimpan di folder tadi.

Jika sudah, Windows secara otomatis akan membuat kopian backup dari file kamu. Kamu bisa menggunakannya untuk me-restore semua file jika terjadi kehilangan. Bisa juga mengembalikan 1 file saja atau roll back sebuah file ke versi sebelumnya.

Cara Menggunakan Backup and Restore pada Windows 10
Microsoft menyertakan fitur Backup and Restore dari Windows 7. Fitur ini juga diketahui dengan nama “Windows Backup“.

Aplikasi ini akan me-restore backup Windows 7 lama apapun ke komputer Windows 10. Tapi kamu juga bisa menggunakannya untuk membackup PC Windows 10 dengan cara yang sama dengan backup PC Windows 7. Tidak seperti fitur File History milik Windows 10, Windows Backup lebih mudah digunakan untuk membackup apa saja dalam HDD kamu.

Kamu bisa menemukan aplikasi ini di Control Panel — cukup search dengan kata kunci “backup” untuk menemukannya.
OneDrive mungkin bukan cara “backup” tradisional, tapi sekarang OneDrive sudah terintegrasi dengan Windows. File-file yang tersimpan di OneDrive akan tersimpan di akun OneDrive kamu secara online sehingga kamu bisa mengakses file tadi di perangkat lainnya juga. Jika kamu menghapus Windows dan menginstallnya lagi (atau menggunakan Windows di perangkat lain), cukup log in dengan akun Microsoft kamu dan semua file di OneDrive akan bisa diakses di File Explorer.

Cara Menggunakan Reset This PC pada Windows 10
Daripada bergantung pada backup system image, kamu bisa menggunakan fitur “Reset This PC” untuk me-restore komputer ke state default sistem operasi. Aplikasi akan menggantikan peran reinstall ulang Windows menggunakan DVD atau USB drive. Cukup reset PC kamu dan PC akan kembali ke factory default settings.

Di Windows 8, ada opsi “Refresh this PC” dan “Reset this PC”. Namun pada Windows 10 hanya ada opsi “Reset This PC”. Cara mengaksesnya mudah, cukup buka app Settings, pilih Update & Security, pilih Recovery, dan klik tombol Get Started dibawah Reset this PC. 

Kamu bisa “menyuruh” Windows untuk tetap menyimpan user files dan me-reset sistem operasi (“refresh”) dan program yang terinstall kembali ke default state, atau menghapus semuanya (“reset”). Jika kamu menghapus semuanya, disarankan menghapus drive nya secara aman.

Cara Menggunakan System Image Backups pada Windows 10
Microsoft ‘menyembunyikan’ fitur system image backup pada Windows 8.1. Tapi karena banyak yang protes, dihadirkanlah pada Windows 10 dan Windows 8.1 terbaru.

Fitur ini bisa kamu akses di control panel Backup and Restore (Windows 7). Cukup klik “Create a system image” di sebelah kiri window, atau buka control panel File History dan pilih “System Image” di sidebar. 

Tidak seperti solusi yang lain, cara ini akan membuat sebuah image dari sistem Windows saat ini, termasuk: sistem operasi, aplikasi terinstall, setting-an, dan file user. Backup ini bisa disimpan di hard drive eksternal, di beberapa keping DVD, atau network. Jika suatu saat kamu membutuhkan komputermu kembali ke state tertentu, kamu bisa me-restore backup image ini.

Yaa secara realistis kebanyakan orang tidak akan menggunakan cara ini. Toh kamu bisa mendapatkan komputermu dalam initial state menggunakan fitur Reset This PC dan me-restore file-file lama dan reinstall semua aplikasi. Ukuran backup akan jauh lebih kecil dan Windows akan membackup secara berkala.

Namun, fitur ini masih terintegrasi dan masih berguna. Jika kamu ingin membuat sebuah system image backup, kamu tidak perlu aplikasi pihak ketiga seperti Norton Ghost atau Acronis TrueImage.

Cara Menggunakan Advanced Startup Options pada Windows 10
Fitur advanced startup options pada Windows 10 bisa kamu akses lewat app Settings, pilih Update & Security, pilih Recovery, dan klik “Restart Now” dibawah Advanced startup. Kamu juga bisa menahan tombol Shift sembari me-restart komputer lewat Start menu.

Dari sini kamu bisa me-restore Windows dari system image yang sudah kamu buat, menggunakan system restore untuk membereskan error, dan menjalankan maintenance lainnya. Jika kamu memakai preview builds pada Windows, menu ini bisa membuatmu kembali ke build sebelumnya jika build yang kamu pakai sekarang tidak bekerja sebagaimana mestinya. Menu ini juga akan tampil otomatis jika saat booting ada yang tidak beres.

Cara Menggunakan Recovery Drive Creator pada Windows 10
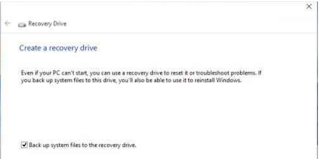
Kamu bisa membuat sebuah USB recovery drive yang akan mengakses advanced setup options sekalipun instalasi Windows 10 kamu rusak dan tidak bisa mengakses menu ini.

Caranya, buka Control Panel dan cari bagian Recovery. Klik ikon Recovery dan kamu akan melihat daftar aplikasi advanced recovery. Klik Create a recovery drive untuk membuat sebuah USB recovery drive. Kamu juga bisa mengaksesnya lewat Start menu, ketikkan RecoveryDrive.exe pada box dan tekan Enter untuk mengakses fitur ini. Boot dari drive tersebut untuk mengakses aplikasi darurat jika kamu tidak bisa mengaksesnya secara normal. Windows 10 tidak lagi menyertakan partisi recovery terpisah, jadi aplikasi ini tidak akan menghapus partisi recovery dari komputer kamu.

Windows 10 menyertakan fitur-fitur troubleshooting lainnya yang sudah ada di versi Windows pendahulunya. Jika komputer kamu tidak stabil, kamu bisa menggunakan fitur system restore untuk mengembalikan file sistem dan setting kembali ke state yang stabil.

Cara Download Subtitle dari Youtube Tanpa Software

Untuk mendownload subtitle film dari youtube sangat mudah. Cukup COPY alamat URL YOUTUBE yang akan di download subtitlenya lalu PASTE di alamat website berikut ini:


  1. http://www.videograbby.com/
  2. http://www.lilsubs.com/
  3. https://savefrom.net/
  4. http://www.downsub.com/
  5. https://amara.org/en-gb/videos/watch/
Disini SoloIFX sudah menganggap langkah selanjutnya sanggatlah mudah untuk dilakukan dan mudah dimengerti umumnya orang. Maka di sini tidak SoloIFX tidak membahas cara penggunaannya.

Cara Membuat USB Ghost Solution Suite Boot dari ISO Image

Ghost Solution Suite 3.x dapat digunakan untuk membuat boot device dari image yang akan direstore. Untuk melakukan ini,  Ghost Standart Tools harus diinstal. Ada juga utilitas pihak ketiga yang harus digunakan yaitu Freeware yang disebut ISO to USB. Tetapi bisa menggunakan software apapun yang bisa untuk burning ISO image ke USB flash drive. Utilitas pihak ketiga diperlukan untuk ini, karena secara default Disk Boot Creator hanya memformat disk USB sebagai FAT32, yang membatasi ruang yang dapat digunakan pada disk menjadi 2GB. Membuat image boot ISO dan membakar image boot akan memungkinkan Anda memilih NTFS sebagai sistem file untuk media boot.

Bagian 1: Membuat Konfigurasi Boot

Bagian ini menceritakan cara membuat konfigurasi boot untuk disk boot Anda. Jika Anda sudah membuat, Anda dapat menggunakan konfigurasi boot yang ada dan pergi ke Bagian 2. 

1. Telusuri ke "C:\Program Files (x86)\Symantec\Ghost\Bootwiz" dan klik dua kali BootWiz.exe.


2. Setelah diluncurkan, klik tombol radio untuk "Go to the Boot Disk Creator Interface" dan kemudian klik OK.


3. Pilih menu File lalu New Configuration.


4. Pada layar "Step 1 of 8: Configuration Name", pada "Enter a name for this configuration (optional)" berikan nama (dan deskripsi, jika Anda mau) dan pilih "Windows PE 5.1" dari menu drop-down untuk "Pre-boot Operating System for this Configuration" . Untuk OEM Extensions, pilih "all". Kemudian klik Next.


5.Pada layar "Step 2 of 8: Windows PE Hardware Device Drivers", klik Next.


6. Pada layar "Step 3 of 8: TCP/IP Protocol Settings",  klik Next.


7. Pada layar "Step 4 of 8: Ghost Solution Suite Server Communication", pilih tombol radio untuk "Use TCP/IP to connect to Ghost Solution Suite Server" dan "Local: Run existing WinPE 4.0 automation agent contained in the local pre-boot environment"l alu klik Next.


8. Pada layar "Step 5 of 8: Network Connection", pastikan domain dipilih dan kredensial sudah benar. Kemudian klik Next.


9. Pada layar "Step 6 of 8: Network Drive Mappings", klik Next.


10. Pada layar "Step 7 of 8: Optional Components", klik Next.


11. Pada layar "Step 8 of 8: Configuration Summary", klik Finish.


12. Wizard akan diluncurkan. Klik Batal untuk menutupnya.

Bagian 2: Membuat Media Boot

Bagian ini memberi tahu Anda cara membuat media boot yang diperlukan.

1. Pada Boot Disk Creator (BDC), klik kanan pada konfigurasi boot dan pilih Create Boot Disk.


2. Pada halaman berikutnya, pilih "ISO (CD/DVD image))" untuk "Boot Media Type". Pilih "Stand-alone boot" sebagai "Boot Task Type". Kemudian pilih Boot media processor type di bagian bawah (x86 / x64). Setelah itu, klik tombol Browse untuk memilih file ISO, lalu klik Next.


3. Setelah BDC selesai, Anda akan memiliki file * .ISO.

4. Unduh utilitas freeware ISO ke USB dari http://www.isotousb.com/ dan instal. Jika Anda memiliki utilitas lain yang mampu membakar file ISO ke USB, Anda dapat menggunakannya. Pastikan untuk memilih NTFS sebagai sistem file.

Harap dicatat: USB to ISO adalah utilitas pihak ketiga. Itu tidak berafiliasi dengan Symantec. Symantec tidak dapat memecahkan masalah alat ini.

5. Buka utilitas itu. Browse file ISO. Pilih USB flash drive Anda di "USB Drive" dropdown. Pilih "NTFS" untuk File System, lalu pilih Burn.


6. Setelah USB diburn dengan ISO, ruang yang tersisa bisa digunakan untuk file Ghost Image. Dan kemudian disk siap untuk melakukan Restore Image langsung dari disk USB.

Bagian 3: Restoring Image

Bagian ini memberitahu Anda cara mengembalikan Image dari disk boot USB dengan gambar.

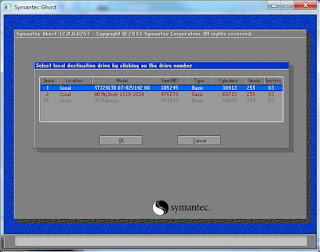
1. Boot mesin Anda ke USB Boot. Norton Ghost akan tampil. Klik OK.


2. Dari menu, pilih Local > Disk > From Image.


3. Ini akan meminta Image Source. Image Source ada di drive USB; WinPE akan menugaskannya huruf drive. Pilih file * .GHO yang sesuai dari lokasi itu.


4. Pilih drive tujuan yang ingin Anda terapkan. Perhatikan bahwa drive yang merupakan sumber untuk Image dalam teks merah dan tidak dapat dipilih.


5. Lanjutkan dengan mengembalikan Image.